Upload the image here and immediately change the image description parameter. |
- "Seerix's holding him, and she's no proper kind of hostess, if you take my meaning. Also, he might know something more that'll help us out." – James, The Chasm Widens (Intermission)
- Mission Giver: James
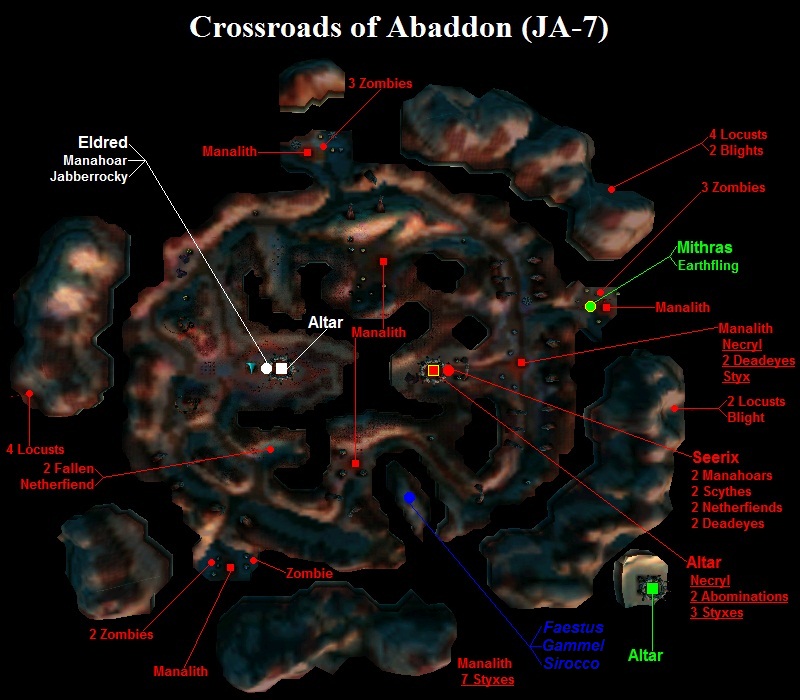
- Location: Crossroads of Abaddon
- Map Creator: Andrew DeLap
- New Spell: Bombardment
- New Creature: Jabberrocky
Map of Abaddon (full image)
Starting Setup[]
- An altar
- 2 souls
- A Manahoar, a Jabberrocky, Sirocco (if alive),Gammel (if alive), and Faestus (if alive).
Objectives[]
Walkthrough[]
- "The war raged unabated in the south, but Pyroborea had fallen into chaos after its Lord's defeat. Traveling that way, I reached the Crossroads of Abaddon unmolested." – Eldred
Fighting Seerix[]
You are sent to the Crossroads of Abaddon, where the seer Mithras (the one you are telling your story to) is apparently being held captive. The necromancer Seerix watches over the prisoner. With only 2 souls, one Manahoar and a Jabberrocky at your disposal, you can certainly expect a rough start! Create a ranged unit right away as you will soon be ambushed by several Locusts; they will come from the direction of the small graveyard nearby. Alternatively, if Gammel's still alive, he'll kill the Locusts for you just as well. Either way, you should create at least one more Manahoar and convert the souls quickly. You don't have time to explore, or even to convert all the souls; Seerix will attack you with a massive army soon: several Styxes, Abominations, Deadeyes, Netherfiends and other Minions!
Luckily, the terrain ensures that Seerix's large army will not be able to attack you all at once, allowing you to fend her off with your inferior force. Order your Jabberrocky to attack Seerix or her more powerful and fragile minions (in particular, the Styx). If you see her trying to cast a powerful spell like Plague or Demonic Rift, immediately order your Jabberrocky to stomp the ground; this will stop her from casting the spell. Other than that, focus on killing Seerix; her army will put up a good fight while she's alive but the retreat will be rather chaotic when she dies, allowing you to get several easy pickings. The nearest manalith is a fair distance away, which helps you convert any enemies left behind.
As you gain souls from Seerix, Guardian a few Boulderdashes to your manalith. You'll soon be going away to free Mithras, and you don't want to be flanked. Unfortunately, Seerix has ways of breaking through even your stronger defenses, but you should do whatever you can to ensure a safe return home.
Rescuing Mithras[]
Once you have about 8 to 10 souls, at least, available to you to be used, it's time to go for Mithras! There are two ways to rescue the seer: desecrate Seerix's altar or escort him back to your altar. Whatever you choose to do, take the path to the right as you leave your altar; it is undefended and Seerix attacks from the other direction as well. Replace the manaliths along the way with your own.
If you choose to escort Mithras, approach him and the Earthfling guarding him, but only if you've got your army right behind you. The Earthfling will join you, but 3 Blights and 6 Locusts will fly in from behind the mountains to kill Mithras. As the seer cannot heal himself, you'll need to kill the fliers yourself, and you'll also need to heal Mithras whenever he gets wounded. If you're lucky, this is all the resistance you'll meet. If not, Seerix will attack you, either here or back at your altar (if she has managed to overrun your defences). You only need to get to your altar to win, though, so just avoid the enemies if you can. Also you can't teleport Mithras to your altar.
If you choose to banish Seerix, you will notice that she has a manalith guarded by a Styx, a Necryl and some Deadeyes right in front of her altar. Destroy it or sneak past it, it doesn't really matter; the altar itself is undefended and dispatching Seerix should be easy with a few strong creatures. Worst case scenario is that she hides near the manalith guarded by a total of 7 Styxes. In this case, train several Boulderdashes to snipe her from afar. After Seerix is gone, you will automatically win.
Trivia[]
Some of Seerix's Manaliths are Pyro Manaliths; most likely due to it being an edited version of The Chasm Widens (Persephone).
| Previous Mission: | Mission Category: | Next Mission: |
| James' Missions | Interlude |
| Missions in Sacrifice | |||||||||
| Missions | 1 | 2 | 3 | 4 | 5 | 6 | 7 | 8 | 9 |
| Persephone | PE-1 | PE-2 | PE-3 | PE-4 | PE-5 | PE-6 | PE-7 | PE-8 | PE-9 |
| James | JA-1 | JA-2 | JA-3 | JA-4 | JA-5 | JA-6 | JA-7 | JA-8 | JA-9 |
| Stratos | ST-1 | ST-2 | ST-3 | ST-4 | ST-5 | ST-6 | ST-7 | ST-8 | ST-9 |
| Pyro | PY-1 | PY-2 | PY-3 | PY-4 | PY-5 | PY-6 | PY-7 | PY-8 | PY-9 |
| Charnel | CH-1 | CH-2 | CH-3 | CH-4 | CH-5 | CH-6 | CH-7 | CH-8 | CH-9 |
| Intermissions | IM-1 | IM-2 | IM-3 | IM-4 | IM-5 | IM-6 | IM-7 | IM-8 | IM-9 |
| Others | Prologue | The Wanderer's Tale | Respite | The Crucible | ||||||||